Adding Methods in Junit Test Class
Moving ahead we would like to add more tests in our previously created test class JunitMathProvider_1. Let's do that. We already have a test method that tests the MathProvider.Add() method. Let's add another method to test MathProvider.Subtract(). Here is how that subtract method will look like:
    @Test
	public void subtract()
	{
		System.out.println("Starting test " + new Object(){}.getClass().getEnclosingMethod().getName());
	    int firstNumber = 10;
	    int secondNumber = 20;
		assertEquals(firstNumber - secondNumber, provider.Substract(firstNumber, secondNumber));
		System.out.println("Ending test " + new Object(){}.getClass().getEnclosingMethod().getName());
	}
It's exactly similar to what our add() test is but this time its subtracting two numbers instead of adding. Having said that important point to remember is that we have our @Test annotation here to tell that its a test method.
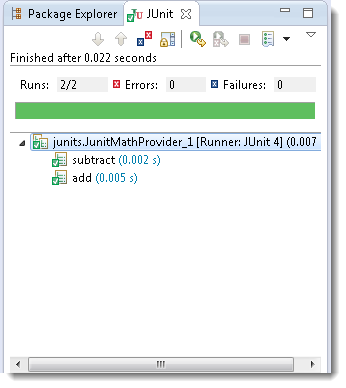
Also, after adding this test you will see that Junit Perspective will show you two tests under the JunitMathProvider_1Class.

Adding extra Junit Test Class
Let's start writing another test class in our Junit and let's name it 'JunitMathProvider_2'. The primary focus of this test class should be to test MathProvider.Multiply method. This class is somewhat similar to the previous class but has a test method named multiply() instead of add() and subtract() test methods. Class will look like this
package Application.UnitTests;

import org.junit.runner.JUnitCore;
import org.junit.runner.Result;
import org.junit.runner.notification.Failure;
package Application.UnitTests;
import static org.junit.Assert.assertEquals;
import org.junit.Test;
import Application.MathProvider;

public class JunitMathProvider_2 {
		MathProvider provider;

	public JunitMathProvider_2{
		provider = new MathProvider();
	};

	@Test
	public void multiply()
	{
		System.out.println("Starting test " + new Object(){}.getClass().getEnclosingMethod().getName());
	    int firstNumber = 10;
	    int secondNumber = 20;
		assertEquals(firstNumber * secondNumber, provider.Multiply(firstNumber, secondNumber));
		System.out.println("Ending test " + new Object(){}.getClass().getEnclosingMethod().getName());
	}
}
By now you will be familiar with what the above-mentioned code will do. It is again a simple unit test class with a method named multiply() as a test method, mind the @Test annotation above multiply() method which makes it a test method.
Running Test Methods and Test Classes
All you have to do is to change the number of classes passed to JUnitCore.runClasses method. Updated TestRunner class will look like this
package junits;

import org.junit.runner.JUnitCore;
import org.junit.runner.Result;
import org.junit.runner.notification.Failure;

public class TestRunner {

	public static void main(String[] args) {
		//This result object has many methods and it is very useful
		//Type result and press dot, all the methods will display
		//This statement is to load all type of results in the result object
		Result result = JUnitCore.runClasses(JunitMathProvider_1.class, JunitMathProvider_2.class);
		//Here it is getting the run count from the result object
		System.out.println("Total number of tests " + result.getRunCount());
		//This is to get the failure count from the result object
		System.out.println("Total number of tests failed " + result.getFailureCount());

		for(Failure failure : result.getFailures())
		{
			//This will print message only in case of failure
			System.out.println(failure.getMessage());
		}
		//This will print the overall test result in boolean type
		System.out.println(result.wasSuccessful());
	}
\
}
Pay special attention to the line JUnitCore.runClasses(JunitMathProvider_1, JunitMathProvider_2); we have added our JunitMathProvider_2 class also. This is how you add more classes to your test run schedule.
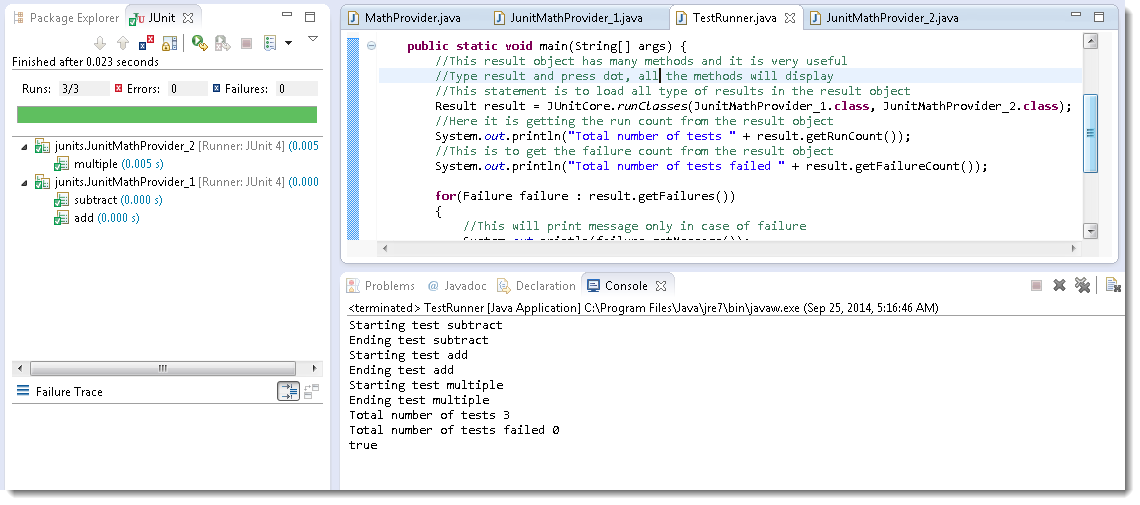
Now if you will see in the JUnit perspective pane you will see that we have one more test class added and in that test class we will have test method named multiply(). Like so
 I hope you are able to understand this tutorial easily. Hope to see you in the next tutorial about Test suite.


