Today we will try to understand the very important concept of Sending Email Reports through Maven from Eclipse.
We know that Maven eliminates the burden of downloading jars and adding them to the build path, instead we now add the dependences that automatically download jars from repository for us. Incase Maven is new to you, I suggest to go through the below tutorials to Learn more about Maven:
We know how much it is important to generate reports for tests we performed and also to send them to team or manager. In Selenium we have three options to notify the test results.
- Send mail using java code ( JavaAPI)
- Configure Jenkins (CI) to send the reports
- To use Maven Post-Man plugin to send reports using eclipse
Steps to Send Reports Automatically to Email using Maven from Eclipse
Now let us focus on the third option using Maven plug-in.To achieve the same there are following steps to perform:
- Create a New Maven Project
- Create a BasicTest to Sum two numbers
- Add Maven Dependencies for TestNG & ExtentReport
- Create TestNg Xml for the Project
- Add Surfire plugin
- Add Post-Man plugin and Run the Maven Test
Step 1: Create a New Maven Project
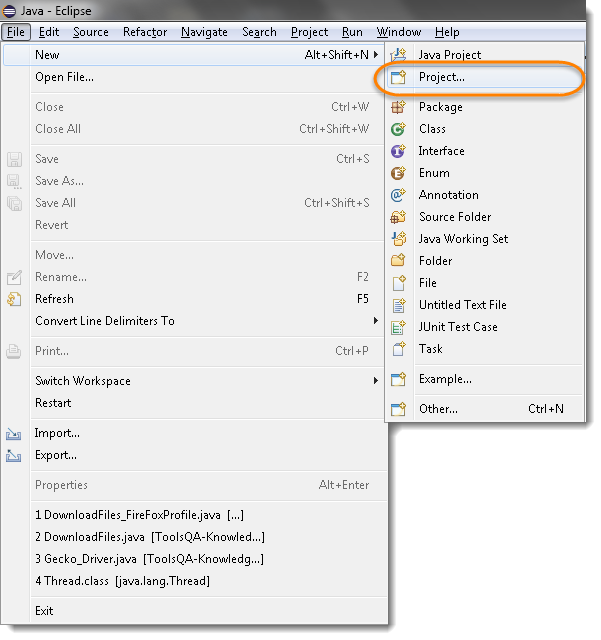
1: Open Eclipse Click New->Project
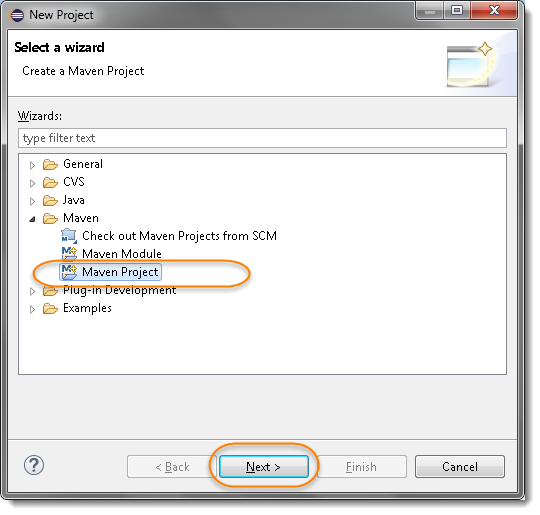
2) Select Maven Project and then Click on Next button
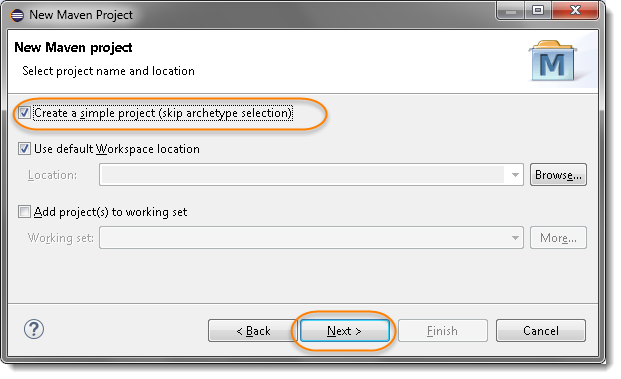
3) Select Create a simple project and Click on Next
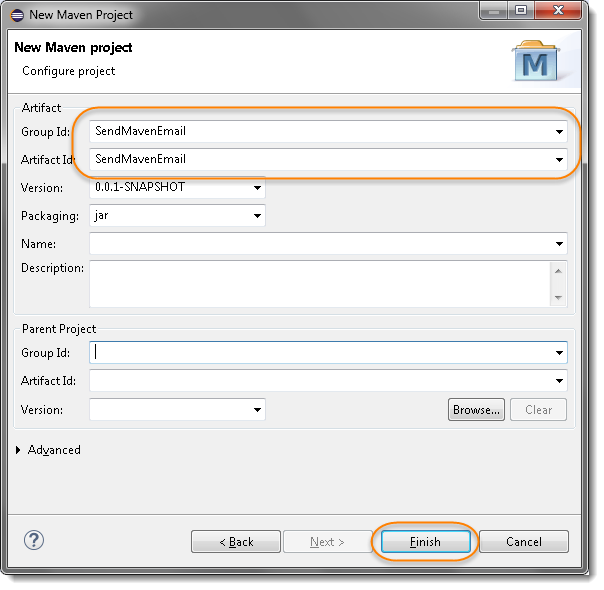
4) Enter Group Id and Artifact Id and Click on Finish. It is nothing but the Name of the Project, so this can be of your choice but I suggest to keep it same for the simplicity of this tutorial.
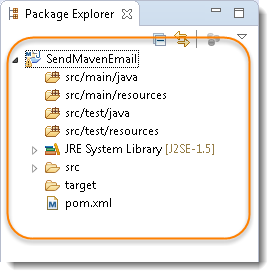
5) When you click Package Explorer available on the left side of the Eclipse IDE, it will display the above created SendMavenEmail project as below
Step 2: Create a BasicTest to Sum two numbers
1) Create Package basicTests under src/test/java. Once done also create a Class file BasicTest with in that.
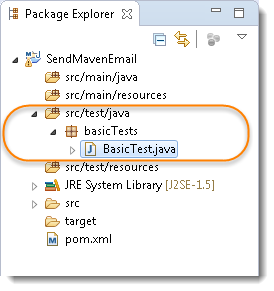
- Paste the following code in the test.
package basicTests;

	import org.testng.Assert;
	import org.testng.annotations.Test;
	import com.relevantcodes.extentreports.ExtentReports;
	import com.relevantcodes.extentreports.ExtentTest;
	import com.relevantcodes.extentreports.LogStatus;

public class BasicTest {
	//Creating ExtentReport and ExtentTest  reference values
	ExtentReports report;
	ExtentTest logger;

	@Test
	public void verifysum(){

		//Create object for Report with filepath
		report=new ExtentReports("./Reports/TestReport.html");

		//Start the test
		logger=report.startTest("VerifySum");

		//Log the status in report
		logger.log(LogStatus.INFO, "calc started ");

		int a=50,b=80,c;
		c=a+b;
		Assert.assertEquals(c, 130);

		//Pass the test in report
		logger.log(LogStatus.PASS, "Test Verified");

		//End the test
		report.endTest(logger);

		//Flush the data to report
		report.flush();
		}
}
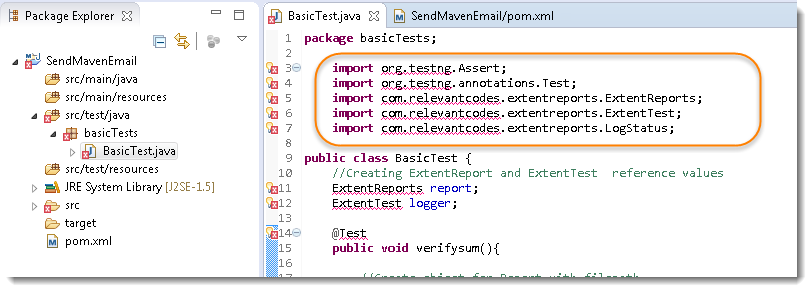
- As of now the code will show many errors in the test. It is because we have used TestNG and ExtentReport in the test and libraries for the same has not been referenced in the project. So the next step is to manage the dependencies using Maven.
Step 3: Add Maven Dependencies for TestNG & ExtentReport
- Double Click on the pom.xml at the Project Explorer to open it. Later click n the pom.xml tab at the bottom to add dependencies.
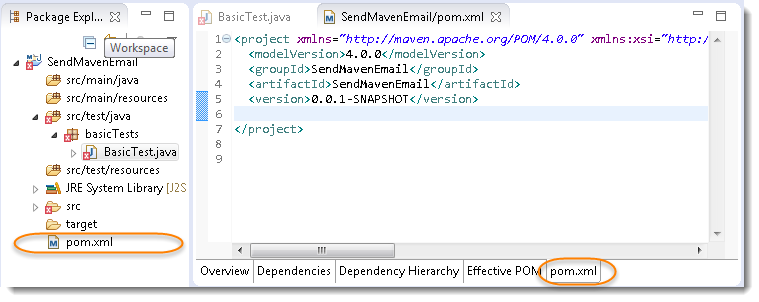
- Add dependencies xml code for TestNG and ExtentReport and Press CTRL + S to save the file which will automatically start downloading the jars.
	<dependencies>
	<!-- Extent Report dependency -->
		<dependency>
			<groupId>com.relevantcodes</groupId>
			<artifactId>extentreports</artifactId>
			<version>2.41.1</version>
		</dependency>
	<!-- TestNG dependency -->
		<dependency>
			<groupId>org.testng</groupId>
			<artifactId>testng</artifactId>
			<version>6.9.4</version>
			<scope>test</scope>
		</dependency>
	</dependencies>
The pom file will look like this now.
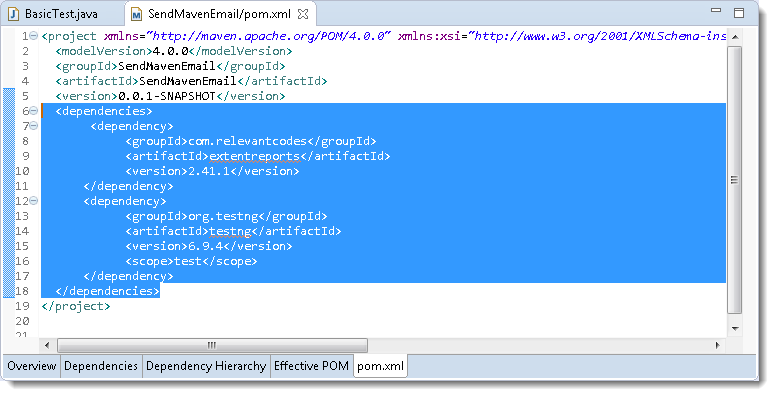
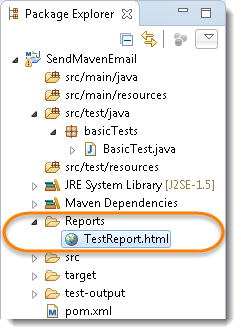
3) Right Click on BasicTest.java and Click on Run as TestNG. Make sure you test get Passed and you find the report for the same.
Step 4: Create TestNg Xml for the Project
1) Create the TestNg Xml file Right Click on the BasicTest =>TestNG => Convert to TestNG
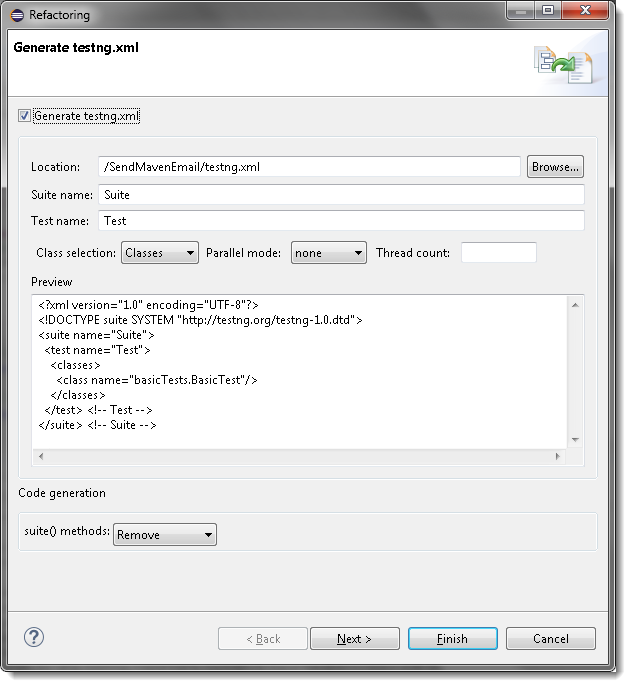
2) Edit the TestNG.xml to any name like SendEmail.xml or you can keep it as TestNG.xml. Click on finish.

Notice a new file is created at the bottom of the Project Explorer with the name testng.xml.
Step 5: Add Surfire plugin
The Surefire Plugin is used during the test phase of the build life cycle to execute the unit tests of an application. It generates reports in 2 different file formats like plain text file, xml files and html files as well. Even if you are using TestNG or Junits framework for reporting, this plugin is must to use, as it helps Maven to identify tests.
- Add the below XML code to pom.xml.
<build>
		<plugins>
		<!-- Suirefire plugin to run xml files -->
			<plugin>
				<groupId>org.apache.maven.plugins</groupId>
				<artifactId>maven-surefire-plugin</artifactId>
				<version>2.18.1</version>
				<configuration>
					<suiteXmlFiles>
				<!-- TestNG suite XML files -->
					<suiteXmlFile>SendEmail.xml</suiteXmlFile>
					</suiteXmlFiles>
				</configuration>
			</plugin>
		</plugins>
</build>
I have named my xml file as testng.xml. In case you have given the different name, enter between <SuitexmlFile> tag.
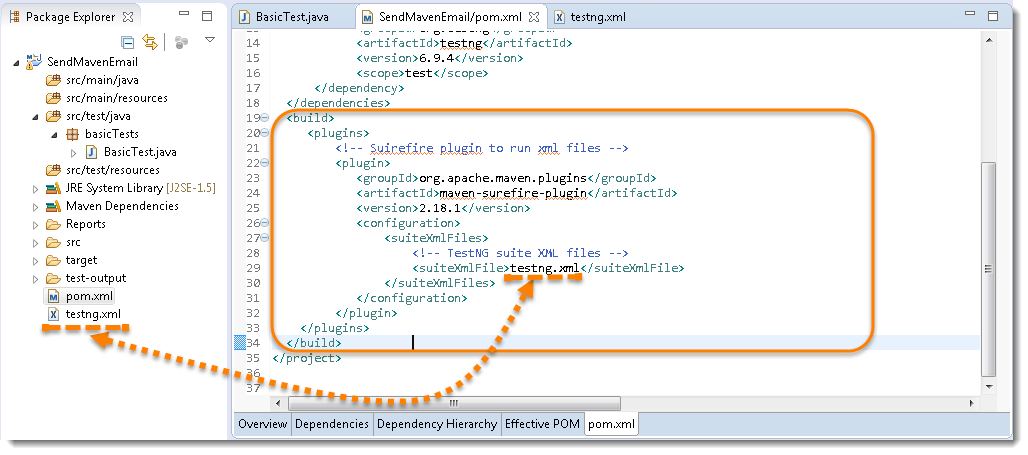
2) We can run the xml file as Right Click by pom.xml and select Run as Maven Test.
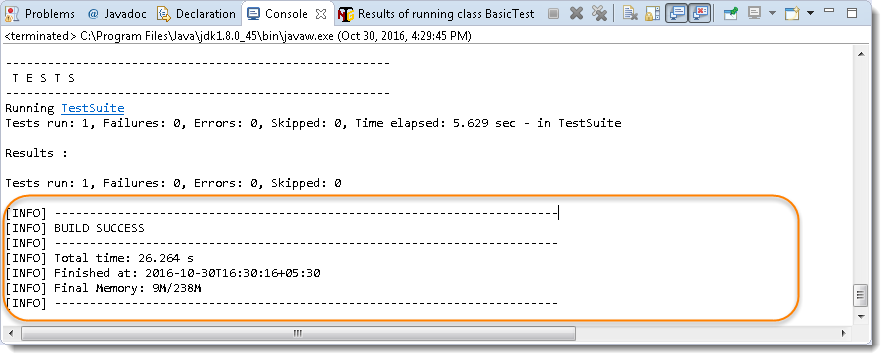
Once the Build Succesful. It is the time to add the Post-Man plugin in pom.xml.
Step 6: Add Post-Man plugin and Run the Maven Test
The Postman plugin allows you to send emails from within your build. Goals are available to send mails if a certain condition is met during the build. Or you can just fire a mail when ever you like.
- Add the below xml code in pom.xml to add PostMan plugin to the project.
<!-- Post-Man plugin -->
		 <plugin>
			<groupId>ch.fortysix</groupId>
			<artifactId>maven-postman-plugin</artifactId>
			<executions>
				<execution>

				<id>send a mail</id>
				<phase>test</phase>
				<goals>
				<goal>send-mail</goal>
				</goals>
				<inherited>true</inherited>

				<configuration>
					<!-- From Email address -->
					<from>from@gmail.com</from>

					<!--  Email subject -->
					<subject>Test Automation Report</subject>

					<!-- Fail the build if the mail doesnt reach -->
					<failonerror>true</failonerror>

					<!-- host -->
					<mailhost>smtp.gmail.com</mailhost>
					<!-- port of the host -->
					<mailport>465</mailport>
					<mailssl>true</mailssl>
					<mailAltConfig>true</mailAltConfig>

					<!-- Email Authentication(USername and Password) -->
					<mailuser>yourEmail@gmail.com</mailuser>
					<mailpassword>yourPassword</mailpassword>

					<receivers>
						<!-- To Email address -->
						<receiver>to@gmail.com</receiver>
					</receivers>

					<fileSets>
					<fileSet>
						<!-- Report directory Path -->
						<directory>C://workspace//SendMavenEmail//Reports</directory>
						<includes>
							<!-- Report file name -->
							<include>TestReport.html</include>
						</includes>
						<!-- Use Regular Expressions like **/*.html if you want all the html files to send-->
						</fileSet>
					</fileSets>

				</configuration>
				</execution>
			</executions>
		</plugin>
Complete POM.xml will be as follows:
<project xmlns="https://maven.apache.org/POM/4.0.0" xmlns:xsi="https://www.w3.org/2001/XMLSchema-instance" xsi:schemaLocation="https://maven.apache.org/POM/4.0.0 http://maven.apache.org/xsd/maven-4.0.0.xsd">
  <modelVersion>4.0.0</modelVersion>
  <groupId>SendMavenEmail</groupId>
  <artifactId>SendMavenEmail</artifactId>
  <version>0.0.1-SNAPSHOT</version>
  <dependencies>
	   <dependency>
		    <groupId>com.relevantcodes</groupId>
		    <artifactId>extentreports</artifactId>
		    <version>2.41.1</version>
	  </dependency>
	  <dependency>
		  	<groupId>org.testng</groupId>
		  	<artifactId>testng</artifactId>
		  	<version>6.9.4</version>
		  	<scope>test</scope>
	  </dependency>
  </dependencies>
  <build>
	 <plugins>
		 <!-- Suirefire plugin to run xml files -->
		 <plugin>
			<groupId>org.apache.maven.plugins</groupId>
			<artifactId>maven-surefire-plugin</artifactId>
			<version>2.18.1</version>
			<configuration>
				<suiteXmlFiles>
					<!-- TestNG suite XML files -->
					<suiteXmlFile>testng.xml</suiteXmlFile>
				</suiteXmlFiles>
			</configuration>
		 </plugin>
	<!-- Post-Man plugin -->
		 <plugin>
			<groupId>ch.fortysix</groupId>
			<artifactId>maven-postman-plugin</artifactId>
			<executions>
				<execution>

				<id>send a mail</id>
				<phase>test</phase>
				<goals>
				<goal>send-mail</goal>
				</goals>
				<inherited>true</inherited>

				<configuration>
					<!-- From Email address -->
					<from>from@gmail.com</from>

					<!--  Email subject -->
					<subject>Test Automation Report</subject>

					<!-- Fail the build if the mail doesnt reach -->
					<failonerror>true</failonerror>

					<!-- host -->
					<mailhost>smtp.gmail.com</mailhost>
					<!-- port of the host -->
					<mailport>465</mailport>
					<mailssl>true</mailssl>
					<mailAltConfig>true</mailAltConfig>

					<!-- Email Authentication(USername and Password) -->
					<mailuser>yourEmail@mail.com</mailuser>
					<mailpassword>yourPassword</mailpassword>

					<receivers>
						<!-- To Email address -->
						<receiver>to@gmail.com</receiver>
					</receivers>

					<fileSets>
					<fileSet>
						<!-- Report directory Path -->
						<directory>C://workspace//SendMavenEmail//Reports</directory>
						<includes>
							<!-- Report file name -->
							<include>TestReport.html</include>
						</includes>
						<!-- Use Regular Expressions like **/*.html if you want all the html files to send-->
						</fileSet>
					</fileSets>

				</configuration>
				</execution>
			</executions>
		</plugin>

	</plugins>
  </build>
</project>
- Press CTRL + S to save the file and to make sure of any format errors in POM.xml. Right Click on POM.xml => Run as Maven test
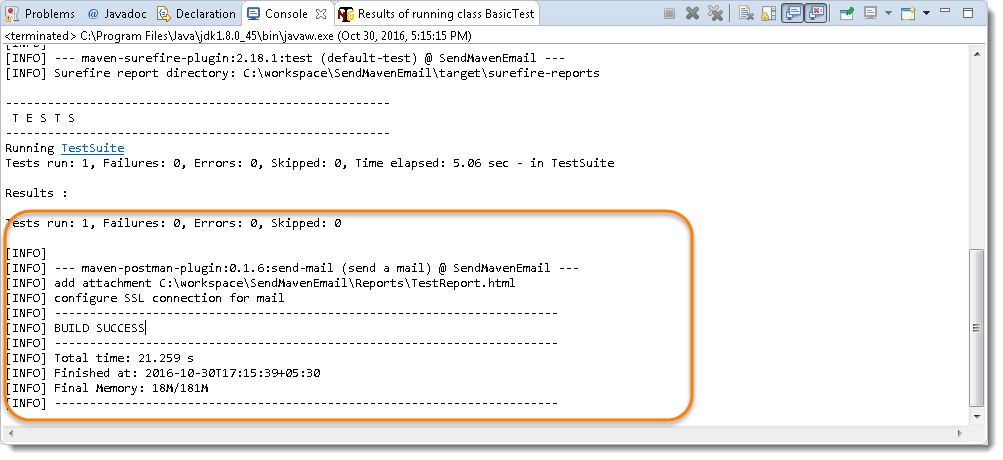
After the test. Maven postman will send the report to email. You will be receiving the email to the Specified email in the receiver tag.

Let us understand the Post-Man plugin
- failonerror => Set to true. If we get error in build it will stop sending email
- mailhost => Specify host name smtp.gmail.com for Gmail
- mailport => Port number as 465 and mailssl => set to true
- mailuser => Enter Username for the mail account
- mailpassword =>Enter Password to access the mail
- receiver => Give the Email address to whom you want to send the report
- directory => Give the Report Directory, where it picks up the report
- include => Give the Report Name. We can user Regular Expression to send the all html files in directory “/.html”*
Errors and Solutions:
When I used the Post-Man plugin I did face the below errors. So I would like to share the solutions:
- [ERROR] Sending the email to the following server failed : smtp.gmail.com:465: AuthenticationFailedException -> [Help 1] Solution: This Error we face when something wrong with username or password or in Email format
- [ERROR] Sending the email to the following server failed : smtp.gmail.com:465: AuthenticationRequired -> [Help 1] Solution: This is very interesting Issue.If we have to login in to Gmail from external source (other than from gmail login) we need to enable less secure option to “ON”. Here is how we do this
- Go to the "Less secure apps" section in My Account.
- Next to "Access for less secure apps", select Turn on. (Note to Google Apps users: This setting is hidden if your administrator has locked less secure app account access.)
- [ERROR] Sending the email to the following server failed : smtp.gmail.com:587: 530 5.7.0 Must issue a STARTTLS command first. y2sm9686661pdm.31 - gsmtp -> Solution: Enable below two options <mailssl>true</mailssl> <mailAltConfig>true</mailAltConfig>
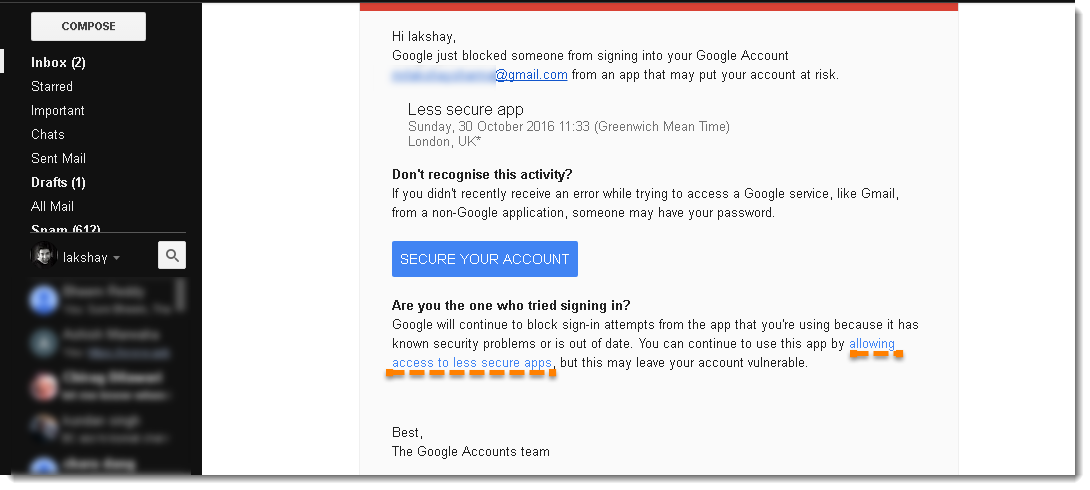
- [ERROR] You mail receive the following mail on your mail account to confirm the Authorise the App usage:
We hope this article helped your purpose Catch you guys with another tutorial…………………..
