Authentication and Authorization in REST WebServices
Authentication and Authorization in REST WebServices are two very important concepts in the context of REST API. The majority of the time you will be hitting REST API's which are secured. By secure we mean that the API's which require you to provide identification. Identification can be provided in the form of
- Username and a Password
- Authentication tokens
- Secret keys
- Bio-metrics and many other ways
In the context of REST API, we will be more interested in the first three options. The Authentication and Authorization models that we will discuss are spread across multiple tutorials, starting from this tutorial.
What is Authentication? and How does Authorization works in REST WebServices?
Authentication is a process to prove that you are the person who you intend to be.
For e.g. while logging into your email account, you prove that you are you by providing a Username and a Password. If you have the Username and the Password you are who you profess to be. This is what Authentication means.
In the context of REST API authentication happens using the HTTP Request.
Note: Not just REST API, authentication on any application working via HTTP Protocol happens using the HTTP Request.
Basic Authentication Flow
Taking the example of email login, we know that in order to Authenticate our self we have to provide a username and a Password. In a very basic Authentication flow using Username and Password, we will do the same thing in REST API call as well. but how do we send the Username and Password in the REST request?
A REST request can have a special header called Authorization Header, this header can contain the credentials (username and password) in some form. Once a request with Authorization Header is received, server can validate the credentials and can let you access the private resources.
Note: I hope from previous tutorials you are able to understand the meaning of a Resource. If not, please go through this tutorial: Rest architectural elements. A private resource is one that is not accessible to everyone. You need to Authenticate yourself to access the private resource. For e.g. the email inbox, you have to login to see the emails.
Let us see it with an example, we have created an API which needs a valid Username and Password to access the Resource.
Endpoint: http://restapi.demoqa.com/authentication/CheckForAuthentication
In the code below we will try to hit the URL and see what is the Response that we get.
@Test
public void AuthenticationBasics()
{
	RestAssured.baseURI = "https://restapi.demoqa.com/authentication/CheckForAuthentication";
	RequestSpecification request = RestAssured.given();

	Response response = request.get();
	System.out.println("Status code: " + response.getStatusCode());
	System.out.println("Status message " + response.body().asString());
}
In the code above we are simply making an HTTP GET request to the endpoint. In this code, we have not added any Authorization header. So the expected behavior is that we will get Authorization error. If you run this test, you will get the following output.
Status code: 401
Status message:
{
    "StatusID": "FAULT_USER_INVALID_USER_PASSWORD",
    "Status": "Invalid or expired Authentication key provided"
}
The output clearly says that we have "Invalid or expired Authentication key provided" error. This means that either there was no Authentication information or the information supplied was invalid. Eventually, server denies our request and returns an error response.
Note: Pay special attention to the Status code returned. In case of Authentication failures Server should respond with a status code of 401 Unauthorized.
Try to hit that URL using a browser. You should get a Username and Password prompt. Below image shows what you should be getting when you hit this URL from browser.
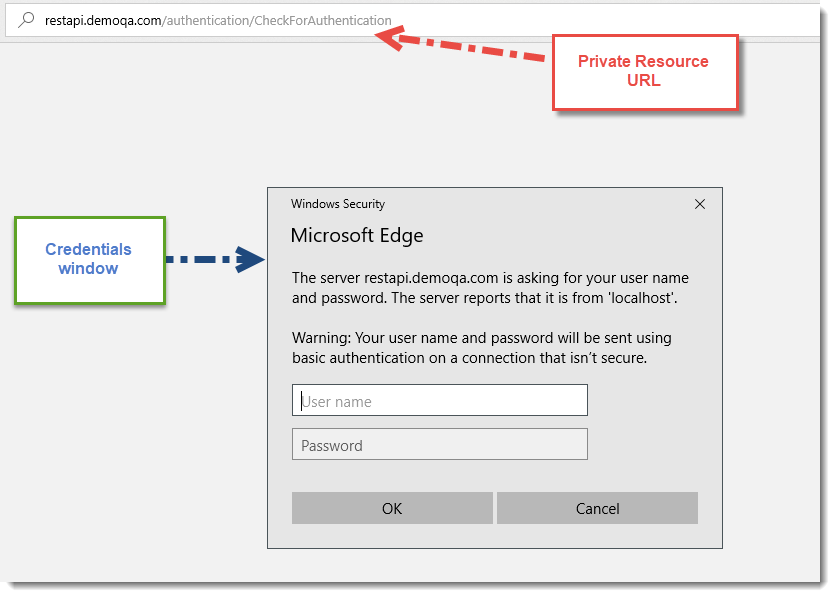
In this tutorial, we will not discuss about how to pass Authentication information in the Request header. Here we will only focus on the definitions of Authentication and Authorization. In the next set of tutorials, we will see different Authentication models, which will solve the above problem.
What is Authorization? and How does Authorization works in REST WebServices?
Authorization is the process of giving access to someone. If you are Authorized then you have access to that resource. Now to Authorize you need to present credentials and as we discussed earlier that process is called Authentication. Hence Authorization and Authentication are closely related terms and often used interchangeably.
Before ending the tutorial let us see the contents of the private resource in the URL mentioned above. To do that enter the following credentials
-
Username: ToolsQA
-
Password: TestPassword
Server will be able to Authenticate and then Authorize you to access the private resource content. The below image shows the content after successful Authentication.

With this basic understanding of Authentication and Authorization, read the coming tutorials where we will discuss the specif types of Authentication models in REST API.
