Most commercial automated software tools on the market support some sort of Data Driven Testing, which allows to automatically run a test case multiple times with different input and validation values. As Selenium WebDriver is more an automated testing framework than a ready-to-use tool. It takes extra efforts to support data driven testing in automated tests.
This is very often required in any automated test to pass data or to use the same test again with different data set. And the good part is that the SpecFlow inherently supports Data Driven Testing using Scenario Outline. There are different ways to use the data insertion within the SpecFlow and outside the SpecFlow with external files.
Data Driven Testing in SpecFlow
- Parameterization without Example Keyword
Data Driven Testing in SpecFlow using Scenario Outline
- Parameterization with Example Keyword
- Parameterization using Tables
Data Driven Testing in SpecFlow using External Files
- Parameterization using Excel Files
- Parameterization using Json
- Parameterization using XML
Scenario Outline - This is used to run the same scenario for 2 or more different set of test data. E.g. In our scenario, if you want to register another user you can data drive the same scenario twice.
Examples - All scenario outlines have to be followed with the Examples section. This contains the data that has to be passed on to the scenario.
Data Driven Testing in SpecFlow
In the series of previous chapters, we are following the LogIn scenario. To demonstrate how parametrizing works, I am taking the same scenario again. It is important for you to be on the same page in term of project code, else you may get confused. Let's take a look at the current state of the project. In case you find it confusing, I would request you to go through the following tutorials
The project folder structure and code should be in the below state.
Package Explorer
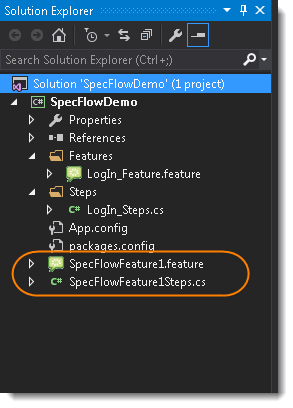
Note: The last two circled files (SpecFlowFeature1.feature & SpecFlowFeature1Steps.cs) were introduced as an example in the first chapter, please delete these two files if you still have these in your project.
LogIn_Feature.fetaure
Feature: LogIn_Feature
	In order to access my account
    As a user of the website
   I want to log into the website

@mytag
Scenario: Successful Login with Valid Credentials
	Given User is at the Home Page
	And Navigate to LogIn Page
	When User enter UserName and Password
	And Click on the LogIn button
	Then Successful LogIN message should display

Scenario: Successful LogOut
	When User LogOut from the Application
	Then Successful LogOut message should display
LogIn_Steps.cs
using OpenQA.Selenium;
using OpenQA.Selenium.Firefox;
using TechTalk.SpecFlow;

namespace SpecFlowDemo.Steps
{
    [Binding]
    public class LogIn_Steps
    {
        public IWebDriver driver;
        [Given(@"User is at the Home Page")]
        public void GivenUserIsAtTheHomePage()
        {
            driver = new FirefoxDriver();
            driver.Url = "https://www.store.demoqa.com";
        }

        [Given(@"Navigate to LogIn Page")]
        public void GivenNavigateToLogInPage()
        {
            driver.FindElement(By.XPath(".//*[@id='account']/a")).Click();
        }

        [When(@"User enter UserName and Password")]
        public void WhenUserEnterUserNameAndPassword()
        {
            driver.FindElement(By.Id("log")).SendKeys("testuser_1");
            driver.FindElement(By.Id("pwd")).SendKeys("Test@123");
        }

        [When(@"Click on the LogIn button")]
        public void WhenClickOnTheLogInButton()
        {
            driver.FindElement(By.Id("login")).Click();
        }

        [When(@"User LogOut from the Application")]
        public void WhenUserLogOutFromTheApplication()
        {
            ScenarioContext.Current.Pending();
        }

        [Then(@"Successful LogIN message should display")]
        public void ThenSuccessfulLogINMessageShouldDisplay()
        {
            //This Checks that if the LogOut button is displayed
            true.Equals(driver.FindElement(By.XPath(".//*[@id='account_logout']/a")).Displayed);
        }

        [Then(@"Successful LogOut message should display")]
        public void ThenSuccessfulLogOutMessageShouldDisplay()
        {
            ScenarioContext.Current.Pending();
        }
    }
}
Parameterizing without Example Keyword
Now the task is to Parameterizing the UserName and Password. Which is quite logical, why would anybody want to hard code the UserName & Password of the application. As there is a high probability of changing both.
- Go to the Feature File and change the statement where passing Username & Password as per below:
When User enter 'testuser_1' and 'Test@123'
In the above statement, we have passed Username & Password from the Feature File which will feed into Step Definition of the above statement automatically. SpecFlow will do the trick for us. After the above changes, the code will look like this:
LogIn_Feature.feature

- Changes in Step Definition file is also required to make it understand the Parameterization of the feature file. So, it is required to update the Test Step in the Step Definition file which is linked with the above-changed Feature file statement.
It can either be done through editing old Step Definition or Create a new one. It is good to create new one with the help of SpecFlow to avoid any syntax error. To do that, simply bring the cursor on the above-changed Step for which need to create a definition and Click F-12 button. This will pop up a dialog box that displays the outline code for the step.
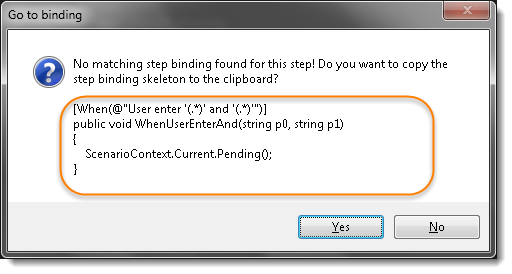
Click on the Yes button to copy the generated skeleton step.
- Now do CTRL + V to paste the code, paste the code just above the old step definition.

Copy the inner code from the old definition and paste it in the new definition. Do not forget to delete the old definition.
- Now the new definition will look like this:

- Same parameters should also go into the associated Test_Step. As the Test step is nothing but a simple C Sharp method, syntax to accept the parameter in the C# method is like this:
public void WhenUserEnterAnd(string username, string password)
Note: Just given the sensible name to p0 & p1 and changed to username & password
- Now the last step is to feed the parameters in the actual core statements of Selenium WebDriver. Use the below code:

- Now to run a Feature Test, Right-click on the test in the Test Explorer window and select Run Selected Tests. This will run the selected test and display the output in the console window.
Note: Feature File can also be run by Right-clicking in the feature and choosing Run SpecFlow Scenarios. But sometimes it creates issue.
The next chapter is about doing Parameterization using Example Keyword in SpecFlow.
