Now that we have known everything about the Cookies from scratch, it is time that we analyse the Cookies in Postman. You can also learn about analyzing cookies in your browser but it is not relevant to this tutorial and moreover learning this in Postman is much more easier and convenient than learning the same in the browser.
In this tutorial we will be focusing on:
- Managing Cookies
- Executing Tests on Cookies
Cookies in Postman
Since cookies are first returned from the server, lets see what cookies are being returned, when we access the Google server. Moving on to the Postman app, hit the following API www.google.com in Postman.

Now go the Headers tab in the response section.

Here you will find Set_Cookie which is the cookie being sent by the server of google.

Header contains too many values and cookies is very important part of a header. Therefore, Postman also gives us a separate option of Cookies.

Note: This will show the same cookies as we saw in the Header section. Cookies displayed in this section are the cookies related to Google. Site specific cookies.
Manage Cookies in Postman
This is how we can see the cookies that we receive from the server to which we have hit the response. Postman also provides a Cookie Manager separately where you can Add, Delete or Modify the Cookies.
Click "Cookies" on the top right.

This will open the cookie manager panel where you can see all the cookies are located.
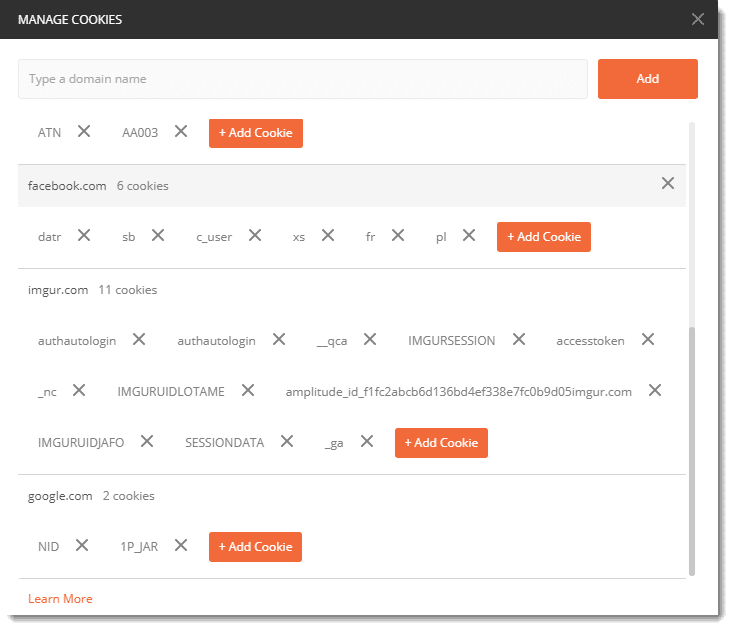
Note: Cookies displayed in this section are browser specific cookies, means cookies saved from your previous made requests, irrespective of websites.
This cookie manager works same as a browser's. It will save all the cookies irrespective of the work you are currently doing. As you can see in my cookie manager it has cookies from imgur.com website which I used in the [OAuth 2.0 tutorial](https://OAuth 2.0) and since then I have used Postman many times. I have also cleared/deleted all the collections related to the Imgur but still the cookies are maintained by Postman just like a browser.
Add Cookies in Postman
To add the cookie. Go to the google.com domain in the manager and click Add Cookie.

A new text box will open up where it will have some values already written. Change those values as given in the image below.
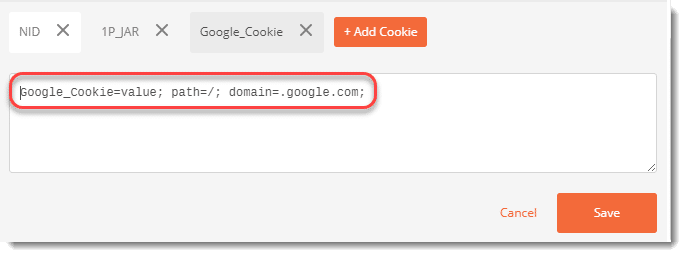
Now you have added a new cookie to the domain google.com. This cookie will be now sent along with the request to the server. Press Save and close the panel. Hit the endpoint again and see the header section now.
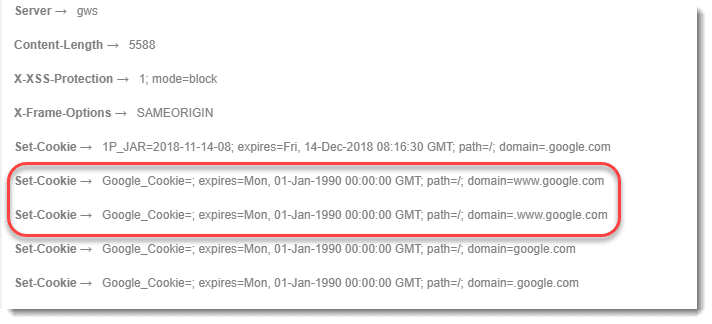
You can see the cookie that we added can be seen here. This is shown multiple times because Google server does not recognize this cookie and hence expiry date is also set to 1990. Notice the expiry date of other cookies.
In the same fashion, cookies can also be modified by opening the already saved cookie in the cookie manager. Please try it yourself as a practice.
Executing Tests on Cookies
In Postman the cookies can also be checked i.e. whether the expected cookie or the expected value is returned or not. This helps us a lot if we are receiving too many cookies. For this you need a few prerequisites.
Pre-Requisites
- Knowledge of Tests- Refer How to set Tests in Postman
- Knowledge of Assertions- Refer How to write Assertions in Postman
- Knowledge of Chai Assertion Library- Refer Chai Assertion Library in Postman
Assertion: Check if Cookie Exists
Here we will check if are getting the cookie that we expect or not. In the test tab, write the following test
pm.test("Cookies_Check", function(){ pm.expect(pm.cookies.has('NID')).to.be.true; });

NOTE: We already know that google.com has NID cookie saved. So we are just checking the same through tests. This will not be the case with other servers. So please check it beforehand for other domains.
The test result will pass signalling that the cookie with the name NID exists in the request.

Assertion: Check for a Value of Cookie
We can also check for a specific value in a cookie. By this test we confirm that the cookie contains same value that we want to see.
Write the following code in your tests tab
pm.test("Cookies_Value_Check", function(){ pm.expect(pm.cookies.get('NID')).to.eql('abc'); });

This code will check if the cookie NID has the value abc or not.
Since this is not the value of NID, we will get a failure status. Also, Postman will tell us the expected value i.e. the correct value of the NID cookie.

By this we can conclude this tutorial here. Cookies are a very important aspect in IT industry today. Since software and applications relies on the user, cookies makes the user experience better than ever. Keep practicing cookies with other domains also. We will move onto our next tutorial now.
