Locating a web element has always been the most vital part of the automation script development. Finding correct, effective, and accurate locator have always been the pain area of any automation test development process. It has compelled QA Engineers to think beyond id, name, class, link, or tagName as locators. XPath has always been one of the favorites locators among the QAs, specifically for locating dynamic elements. XPath in Selenium provides various xpath functions and axes(relationships), which helps to write effective XPaths of the web elements and defining a unique locator for the web elements. In this article, we will cover details of all those functions and axes, using which we can choose the XPath of a web element very effectively and uniquely, by covering the details under the following topics:
- What are XPath Functions in Selenium?
- XPath Contains() function
- XPath Starts-with() function
- XPath Text() function
- AND & OR operators
- What are the XPath Axes in Selenium?
- Ancestor Axis
- Child Axis
- Descendant Axis
- Parent Axis
- Following Axis
- Following sibling Axis
- Preceding Axis
- XPath Example: Usage of XPath functions and Axes in Selenium
What are XPath Functions in Selenium?
Sometimes while working in a dynamic web environment, it becomes challenging to locate a particular web element by using general attributes such as name, class, etc. Several different elements may have similar properties, for example, similar names or class names. Even the simple XPath strategies we discussed in the previous chapter may not be very efficient, as in such a case, a simple XPath may return more than one element. To overcome such scenarios, XPath in Selenium offers XPath functions that can write effective XPaths to identify elements uniquely. Let's understand what XPath provides all different functions in Selenium, which helps in uniquely locating a web element:
Xpath Contains() function
XPath Contains() is one of the methods used while creating an XPath expression. We can use it if part of the value of any attribute changes dynamically. It can identify any attribute by using its partial value. The syntax for using the XPath contains() method is:
//tag_name[contains(@attribute,'value_of_attribute')]
where the contains() method accepts two parameters:
- The attribute of the tag which needs to validate for locating the web element.
- The Partial value of the attribute, which the attribute should contain.
Let’s look at an example on page "https://demoqa.com/text-box", where we will try to find the element using partial attribute value. Here we are trying to locate the textbox of Full Name, as highlighted below:
%20function%20in%20Selenium.png)
Let's look at the DOM of the element.
<input autocomplete="off" placeholder="Full Name" type="text" id="userName" class=" mr-sm-2 form-control">
Here, we have an “id ” attribute with value as “username”. Instead of using the complete value “username”, we can use a part of the value and use it with contains() to identify the element.
So, the XPath that can locate the element will be:
//input[contains(@id, "userN")]
Here we have used “userN ” as partial value. We can use any part of the attribute value that seems to appropriate.
Similarly, we can also write XPath of the Email textbox. The DOM of this element is:
<input autocomplete="off" placeholder="name@example.com" type="email" id="userEmail" class="mr-sm-2 form-control">
We can use any of the attributes for element identification. For example, here, let us take placeholder as an attribute to identify the element. So, the XPath will be:
//input[contains(@placeholder, "example")]
So this way, we can locate any of the web elements by using the partial validation of the attributes. This approach becomes very handy when the attributes of the web element change at run time by keeping a part of the attribute static.
XPath Starts-with() function
The XPath starts-with() function, as the name suggests, finds the element which has attribute value starting with the specific given character or character sequence. This function is quite useful while dealing with dynamic web pages. Imagine an element that has an attribute value that keeps on changing with every page load or page operation. Usually, these dynamic elements have few common starting characters, followed by random dynamic texts. Apart from the dynamic attribute, this can also identify static elements.
Syntax of the starts-with() method for XPath is:
//tag_name[starts-with(@attribute,'Part_of_Attribute_value')]
where the starts-with() method accepts two parameters:
- The attribute of the tag which needs to validate for locating the web element.
- The Partial value of the attribute, which we expect from the attribute to start.
Let’s have a look at an example on page "https://demoqa.com/text=box", where we will consider the element “Full Name” and try to locate it using XPath:
%20function.png)
Xpath Example:
If we look at the DOM of the web element, it is:
<input autocomplete="off" placeholder="Full Name" type="text" id="userName" class=" mr-sm-2 form-control">
So the XPath Expression for the following element using starts-with() function will be:
//input[starts-with(@placeholder,"Fu")]
Here we have used the ‘placeholder ’ attribute to identify the textbox element. So, the actual placeholder value for the element is “Full Name”, but with the starts-with() function, we can use the starting few characters to recognize the element.
XPath Text() function
This function uses the text of the web element for locating the element on the webpage. This function is quite useful if your element contains the text, for example, labels, which always contain a static text.
The syntax of the text() function in XPath is:
//tag_name[text()='Text of the element']
where the text() method returns the text of the web element identified by the tag_name, and it compares the value with the string provided on the right side.
Let's have a look at the webpage "https://demoqa.com/text-box" and try to locate the “Email ” label using text() function.
%20function.png)
Here as we can see, the DOM structure of the element is:
<label class="form-label" id="userEmail-label">Email</label>
Xpath Example:
We will be using the text present in the UI for recognizing the element. The text on the UI is “Email”, and the same is present between element tag, i.e., <label> ….</label>
So the XPath Expression for the label element will be:
//label[text()=”Email”]
Here we directly used the text present on the web page to identify the element instead of using the attribute and values to recognize the same.
AND & OR operators
The "and " operator is used to combining two different conditions or attributes to identify any element from a webpage using XPath efficiently. For example, if we have two attributes, a and b, we can combine both to uniquely identify an element on the webpage using the "and " operator.
The syntax for using the “and ” operator is:
//tag_name[@name = 'Name value' and @id = ‘ID value’]
Here, we are using name and id attribute; you can use any attribute required to identify the element uniquely.
The "or " operator is used to locate an element based on any of the conditions segregated by the "or " operator. We use it majorly based on certain run-time conditions. The attributes of the element can contain any of the values, so putting a condition with "or " will ensure that the element is locatable with any one of those conditions.
The syntax for using the “or ” operator is:
//tag_name[@name = 'Name value' or @id = ‘ID value’]
So, if any one of the conditions is true, the XPath will locate the element successfully.
Let's try to understand the same with the help of an example on the web page "https://demoqa.com/text-box".
Here we want to identify and locate the element “Full Name ” using both AND & OR operators.
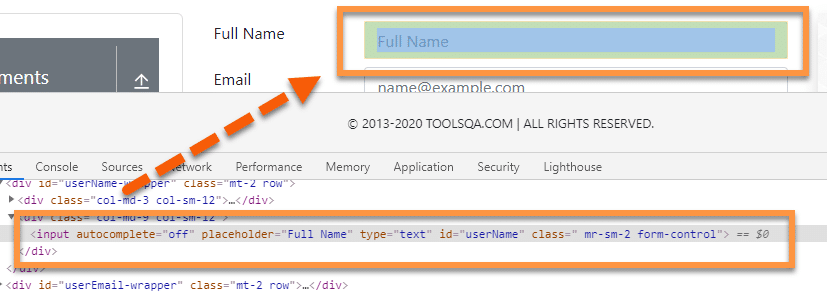
XPath using AND operator:
//input[@placeholder ='Full Name' and @type = 'text']
Here, we have combined placeholder and type attributes to locate the element. Both the conditions, i.e., the attribute values, must be available to locate the element.
XPath using OR operator:
//input[@placeholder ='Full Name' or @type = 'text']
In this example, we have used attribute placeholder and type with ‘or ’ operator. Here either placeholder or type attribute needs to match with the element property present on the webpage. If any of the conditions (attribute) meet, then XPath will locate the element.
Now, there can be scenarios that, even after using the above functions, sometimes the user is not able to locate the web elements uniquely. In those scenarios, the XPath axes come as a rescue and help locate a web element with the help of its relationship with other web elements on the web page. Let's understand what XPath provides all different types of axes in Selenium.
What are the XPath Axes in Selenium?
We read that XPath in Selenium uses the Absolute and Relative paths to locate the web elements. Additionally, all the web elements in the XML DOM are related to each other via a hierarchical structure. XPath provides specific attributes that are called "XPath Axis", and these use the relationship between various nodes to locate those nodes in the DOM structure. The following table shows a few of those Axis, which can locate the elements on a web page using XPath in Selenium.
| Axis | Description |
|---|---|
| ancestor | This axis locates the ancestors of the current node, which includes the parents up to the root node. |
| ancestor-or-self | This axis locates the current node as well as its ancestors. |
| attribute | This axis specifies the attributes of the current node. |
| child | This axis locates the children of the current node |
| descendant | This axis locates the descendants of the current node, i.e., the node's children up to the leaf node. |
| descendant-or-self | This axis locates the current node and its descendants. |
| following | This axis locates all nodes that come after the current node. |
| following-sibling | This axis locates the below siblings of the context node. Siblings are at the same level as the current node and share its parent. |
| parent | This axis locates the parent of the current node. |
| preceding | This axis locates all nodes that come before the current node. |
| self | This axis locates the current node. |
Let's understand a few of them in more detail with examples in the following sections:
Xpath Ancestor Axis
The ancestor axis is used in XPath to select all the parent (and parent of the parent) elements of the current node. It’s beneficial in scenarios where we can identify the node of the child element, but we are not able to recognize its parent or grandparent nodes. For these scenarios, we can take the child node as a reference point, and we can use the “ancestor” axis to recognize its parent node.
Syntax and usage of the ancestor in XPath:
//tag[@attribute ='Attribute_Value']//ancestor::parent_node
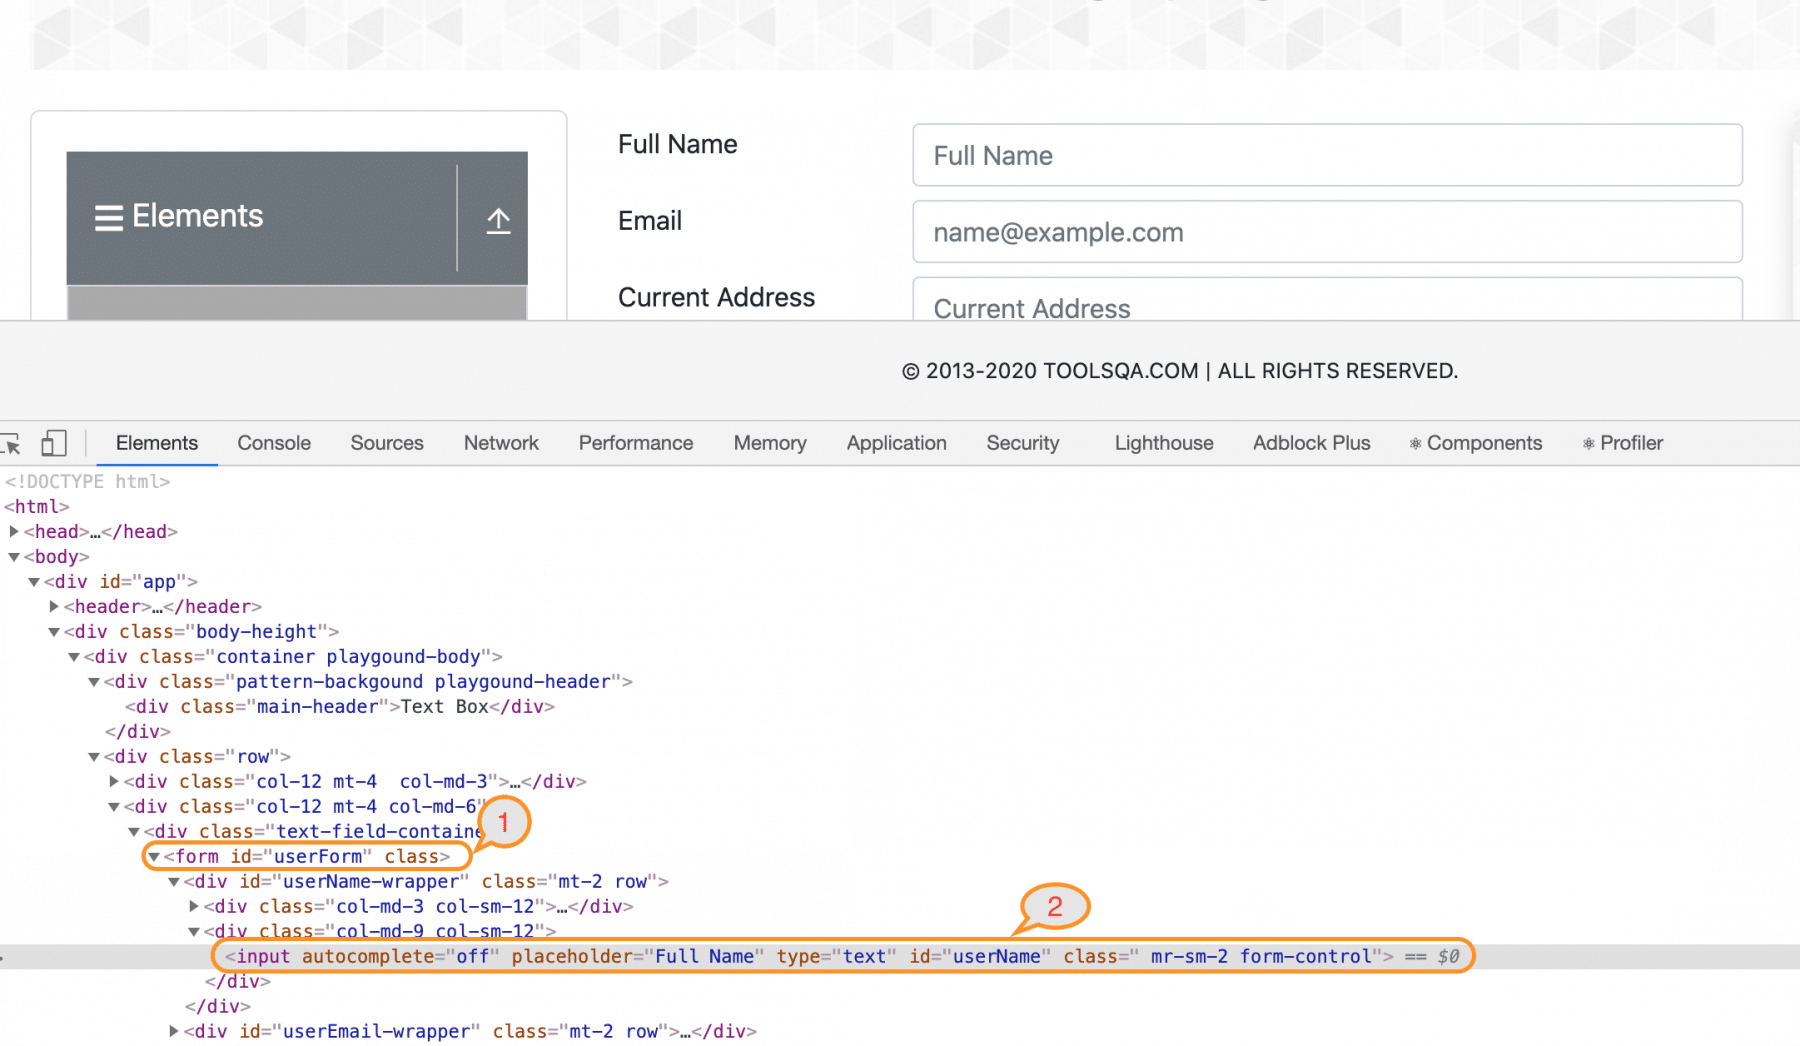
Let's have a look at the following example. Let's say we want to locate the userForm(shown by marker 1) on the webpage "https://demoqa.com/text-box", but due to its dynamic properties, we cannot directly identify it. But we can identify the “Full Name” label
(shown by marker 2 ) present on the page. Here we can use the ancestor axis to identify the parent node.
Xpath Example:
The XPath Expression for the Full Name label is:
//label[text()=”Full Name”]
But we want to locate the <form> tag, which is two hierarchy above this element. Let's write the XPath Expression that can locate the form node.
//label[text()="Full Name"]/ancestor::form
At first, we wrote XPath to locate the child node and then used the ancestor axis to find the form node. One thing that we should keep in mind is, if there is more than one parent node with the same tag, then this same XPath will identify several different elements.
XPath Child Axis
Child Axis in XPath is used to find all the child nodes of the current node. Contrary to the ancestor axis, the child is quite helpful in locating elements if we can locate the parent element of the required node.
Syntax and usage of the child axis in XPath is:
//tag[@attribute ='Attribute_Value']//child::child_node
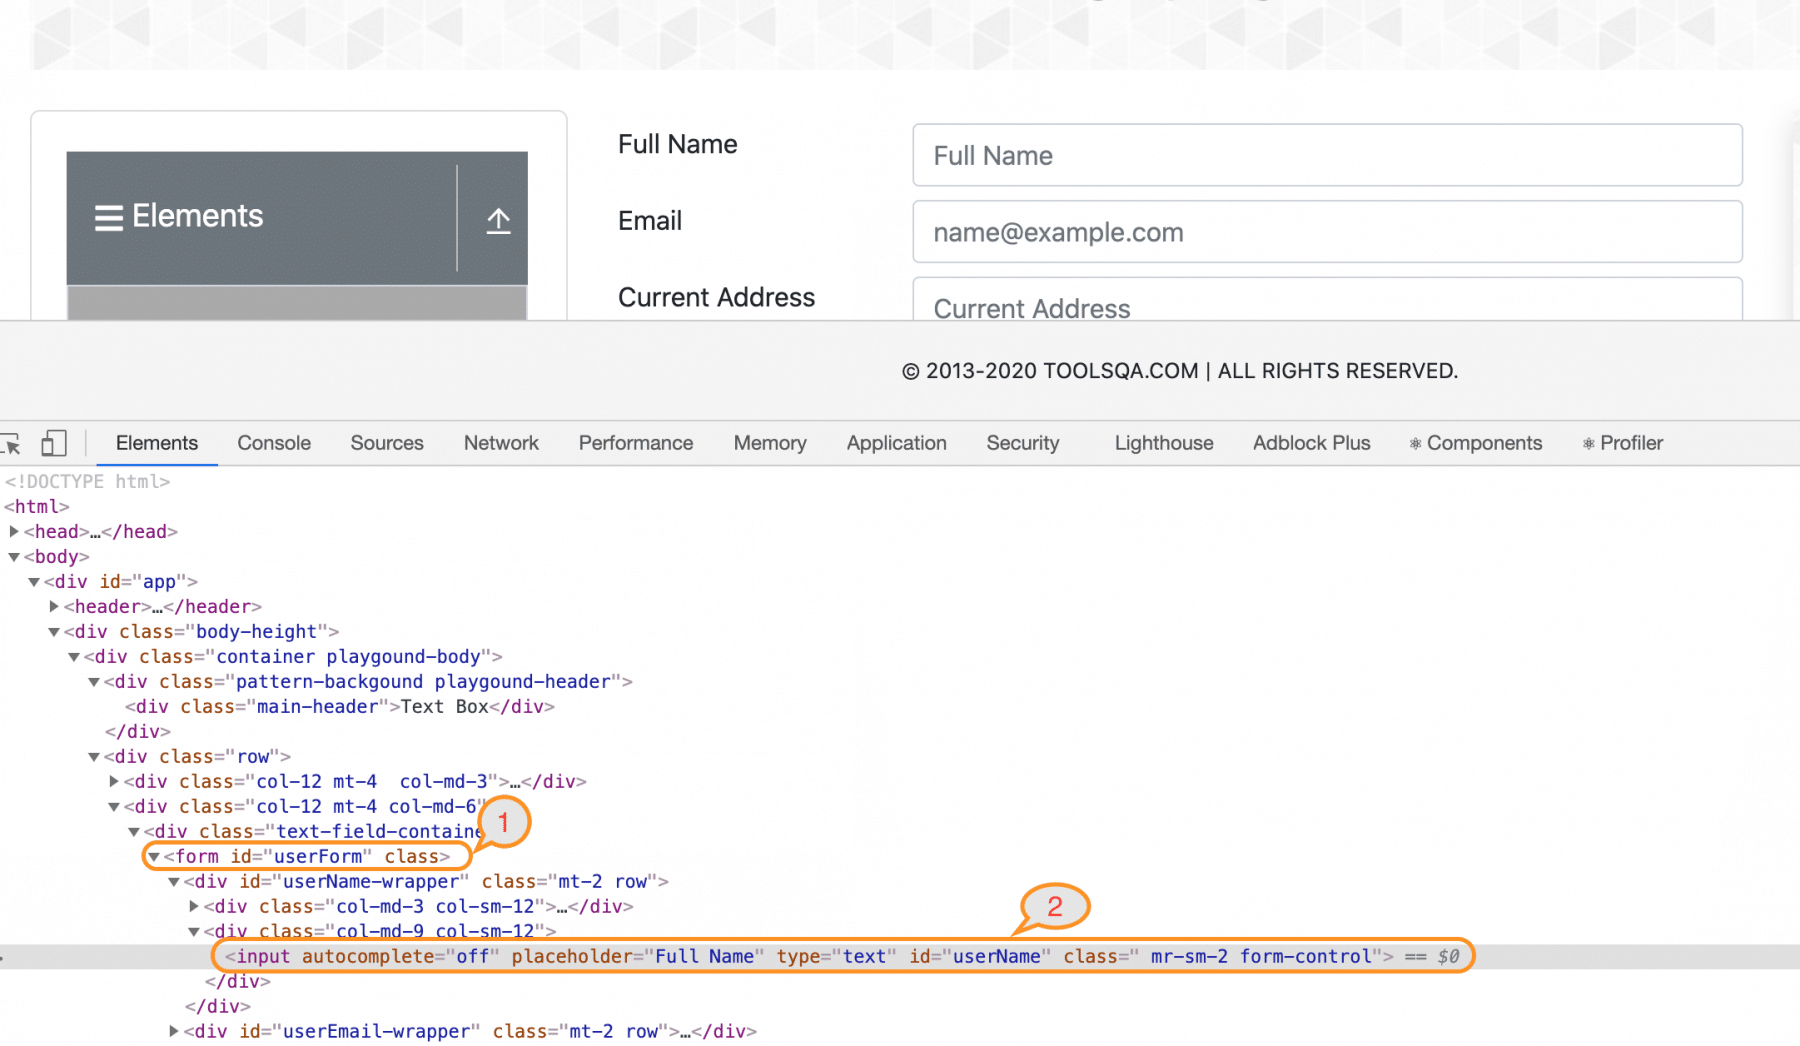
Let’s see the previous example; assume that we can locate the “form” element but not able to find the “Full Name” label.
Xpath Example:
The XPath Expression for the form node is:
//form[@id='userForm']
But we want to locate the <label> tag, which is two hierarchy below this element. Let’s write the XPath Expression that can locate the label node.
//form[@id='userForm']/child::div[1]//label
Here we can see that this XPath comprises two parts, first before “child ” and second part after the child. Both parts have to be in the proper format. Here we have first located the user form by using ‘id’. Then we used the “child ” axis to navigate to the child node. Here we have used index “[1] ” as we wanted to start from the first “div” if we wanted to start from the second div in the sequence, we could index it as “[2] ”. We have also used double slash, as we wanted to escape the next div to directly move to label tag, by using the Relative XPath.
XPath Descendant Axis
The Descendant Axis is used to access all the children and sub-children of the current node. It is similar to the child axis, but the fundamental difference between descendant and child is; descendant identifies only the children and sub-children of the same node.
Syntax and usage of the descendant axis in the XPath:
//node[attribute='value of attribute']//descendant::attribute
Let's have a look at an example on the web page "https://demoqa.com/radio-button" :
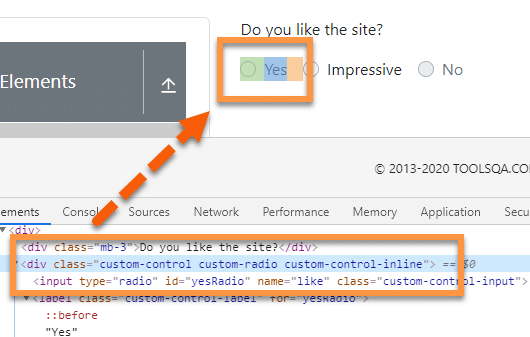
In the above image, we can see that the parent node, i.e., div contains two different descendant nodes or child nodes. First is the radio button defined by the input tag, and the second one is a label tag that has the label for the radio button.
Xpath Example: Let's assume we can recognize the parent tag, but need to locate the radio button. We can do this by using the descendant axis to create the following XPath.
//div[@class= 'custom-control custom-radio custom-control-inline']/descendant::input
So, this Xpath will first search the node "div " with the given class and then search the input tag using the descendant axis.
XPath Parent Axis
The Parent Axis is similar to the ancestor axis. It recognizes the immediate parent of the current node. The significant difference between parent and ancestor is; ancestor will recognize all upper hierarchical nodes, whereas the parent axis will only locate the immediate parent node.
Syntax and usage Parent Axis in XPath:
//tag[@attribute ='Attribute_Value']//ancestor::parent_node
Let's take an example of the element we used in the previous section:
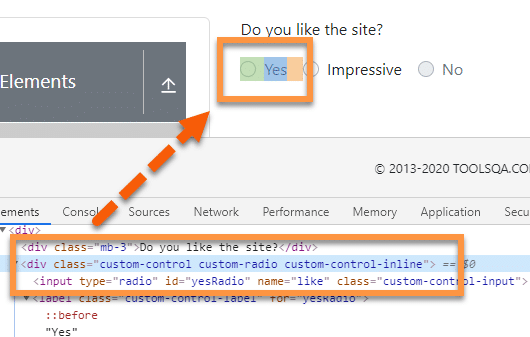
Xpath Example: Here we have an input element that can be recognized. But let’s assume we want to locate the parent element of this node. To do that, we will use the parent axis with the XPath. So, the XPath Expression for the above elements will become:
//input[@id='yesRadio']/parent::div
If we have used ancestor here, the XPath would have returned all the upper hierarchical nodes, but as we have used parent, it will return the immediate parent node of the currently identified node.
XPath Following Axis
The following axis locates the element after the current node. It marks the current node as the base and finds the required element present in the DOM after the current node.
Syntax and usage of the following axis in the XPath:
//node[attribute='value of attribute']//following::attribute
Let's have a look at the following example on the web page "https://demoqa.com/text-box" :
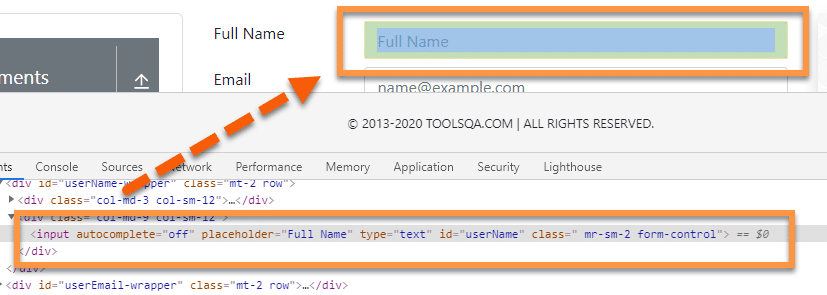
Xpath Example: In the above image, let's assume we have to locate the Full Name textbox by using id. Still, we also want to locate elements present after that textbox, for example, “Current Address” multi-line textbox or text area. So, the XPath Expression for the Current Address will be:
//input[@id="userName"]/following::textarea
One thing that we should note is when we use the following axis, it will recognize multiple tags if present in the DOM. If there is more than one “Textarea” node after the given textbox, then the XPath will point to all of them. The best practice is the always create unique XPaths, and if that’s not possible, we may use index.
XPath Following sibling Axis
The Xpath following sibling axis is similar to the following axis. Following-sibling recognizes only sibling nodes, i.e., the nodes on the same level of the current node. For example, in the below image, both the highlighted “div” are on the same level, i.e., are siblings, whereas the “div ” just above them is the parent.

Syntax and usage of the following-sibling axis in the XPath:
//node[attribute='value of attribute']//following-sibling::attribute
Let's understand the details with the help of the following example on the web page "https://demoqa.com/text-box" :
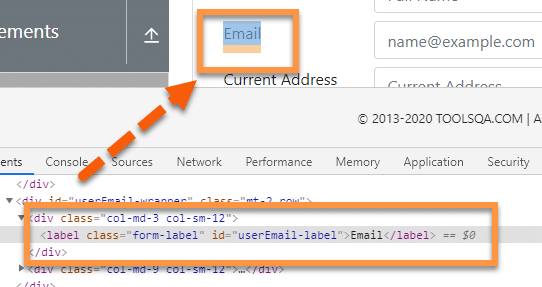
Assume we have identified the following label “Email ” represented by the <div> element:
And we need to identify its sibling “div ” element, as shown below:
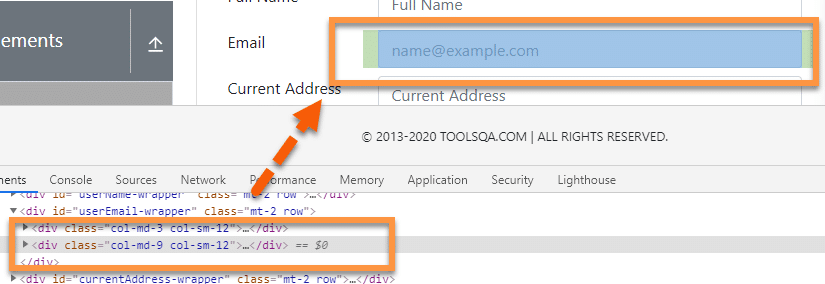
Xpath Example: To identify this, we can use the XPath following sibling axis. So, the XPath Expression for this scenario will be:
//div[@class='col-md-3 col-sm-12']/following-sibling::div
But if there are multiple siblings with the same node, then XPath will identify all those various elements.
XPath Preceding Axis
The preceding axis is used in XPath to select all the nodes present before the current node. We use it when we can recognize any element above the mentioned element.
Syntax and usage of the Preceding Axis in the XPath will be:
//node[attribute='value of attribute']//preceding::attribute
Let's try to understand the usage of the Preceding Axis, with the help of the following example:
%20function%20in%20Selenium.png)
In the above scenario, as the highlighted textbox contains “id”, we can quickly locate it, but let's assume that we need to find the label of the element which is present just before that current node. To handle these scenarios, we use the “preceding axis”. Now, we can write an XPath Expression to locate the label element as below:
//input[@id='userName']/preceding::label
Similar to what we discussed earlier, if there is more than one element with the same node above the current element, XPath will return multiple elements. We always need to make sure that we write unique XPaths for efficient element identification.
XPath Example: Usage of XPath functions and Axes in Selenium
The following code snippet shows a sample example of how we can use the various functions and axes provided by XPath in Selenium to identify and locate web elements uniquely:
package TestPackage;

import org.openqa.selenium.By;
import org.openqa.selenium.WebDriver;
import org.openqa.selenium.chrome.ChromeDriver;

public class XPathDemo {

	public static void main(String args[]) {

	System.setProperty("webdriver.chrome.driver", "C:\\Selenium\\chromedriver\\chromedriver.exe");
	WebDriver driver = new ChromeDriver();

	driver.get("https://demoqa.com/text-box");

	//Using contains() to locate full name and enter data
	driver.findElement(By.xpath("//input[contains(@id, 'userN')]")).sendKeys("User Name");

	//using placeholder
	driver.findElement(By.xpath("//input[contains(@placeholder, 'example')]")).sendKeys("Using Placeholder");

	//using start-with()
	driver.findElement(By.xpath("//input[starts-with(@placeholder,'Fu')]")).sendKeys("Using start with");

	//using text() to get label
	String text = driver.findElement(By.xpath("//label[text()='Email']")).getText();
	System.out.println(text);

	//using AND operator to locate full name
	driver.findElement(By.xpath("//input[@placeholder ='Full Name' and @type = 'text']")).sendKeys("AND operator");

	//using OR operator to locate full name
	driver.findElement(By.xpath("//input[@placeholder ='Full Name' or @type = 'text']")).sendKeys("OR operator");

	//using ancestor to locate form tag
	boolean bol =driver.findElement(By.xpath("//label[text()='Full Name']/ancestor::form")).isDisplayed();
	System.out.println("Form is displayed : "+bol);

	//using child to locate full name textbox from form
	String label = driver.findElement(By.xpath("//form[@id='userForm']/child::div[1]//label")).getText();
	System.out.println("The label text is : "+ label);


	//using decendent axis to locate yes radio
	driver.get("https://www.demoqa.com/radio-button");
	driver.findElement(By.xpath("//div[@class= 'custom-control custom-radio custom-control-inline']/descendant::input/following-sibling::label")).click();

	//using parent axis to locate yes radio
	boolean bo = driver.findElement(By.xpath("//input[@id='yesRadio']/parent::div")).isSelected();
	System.out.println("The Yes radio is selected : "+bo);

	//using following axis to locate current address
	driver.get("https://demoqa.com/text-box");
	driver.findElement(By.xpath("//input[@id=\"userName\"]/following::textarea")).sendKeys("Text Area locate following");

	//using following-sibling to locate email
	driver.findElement(By.xpath("(//div[@class='col-md-3 col-sm-12']/following-sibling::div/input)[2]")).sendKeys("abc@xyz.com");

	//using preceding-axis to locate full name
	String preceding = driver.findElement(By.xpath("//input[@id='userName']/preceding::label")).getText();
	System.out.println("The value of preceding : "+preceding);
	}

}
When we run the above test script, it will locate all the mentioned web elements uniquely. This way, we can utilize the XPath functions and axes to choose effective XPath for uniquely locating the elements on a web page.
Key Takeaways
- XPath can even locate elements in a dynamic web environment using its functions and axis, making it one of the most popular Selenium locators techniques.
- We can create the XPath either by using ID, class, name, substring, or inner Text of a web element, or we can even use a combination of them using “AND” or “OR” operators.


